fxDreema

    • Register
    • Login
    • Search
    • Back to the main page
    • Categories
    • Recent
    • Tags
    • Popular
    • Search

    TUTORIAL - Creating a new buffer to use indicator colors.

    Tutorials by Users
    2
    2
    429
    Loading More Posts
    • Oldest to Newest
    • Newest to Oldest
    • Most Votes
    Reply
    • Reply as topic
    Log in to reply
    This topic has been deleted. Only users with topic management privileges can see it.
    • P
      PhiLykia last edited by

      Hello friends, there are often questions in the forum about how to use the color change of an indicator as a signal.

      As you know, the color change is created in the indicator as a result of a calculation. If we can assign this calculation result as a value along with the color to a separate buffer (although it already exists but is not available as a buffer), you can use it as you wish.

      Let's now examine how to do this.

      (First of all, be sure to save your indicator under a different name. We don't want to lose its original state.)

      First, let's open the indicator with IDE.

      586ce508-1e51-4274-bca9-03df9ea52f09-image.png

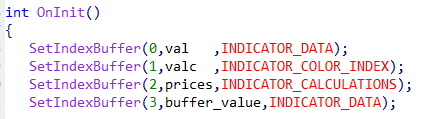
      Let's add buffer with a new name to the buffer definitions under OnInit. I used the name buffer_value as an example. Use the sequence number when adding a new buffer.
      (the following number is 3 in the example).

      40705bc3-d78c-42fd-b9e4-a4ac693c4d85-image.png

      We increase the number of available buffers by one. Along with this, we also increase the number of buffers to be displayed by one.

      7548b772-f7d3-4ead-a362-92df21dff6d8-image.png

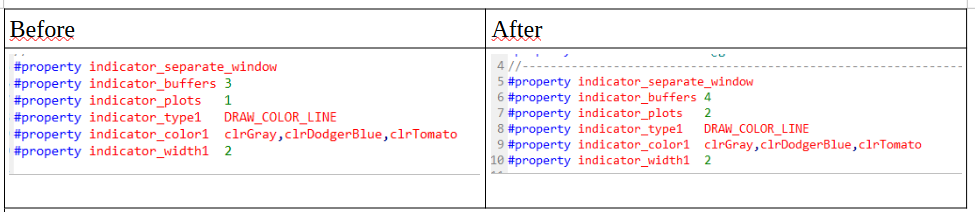
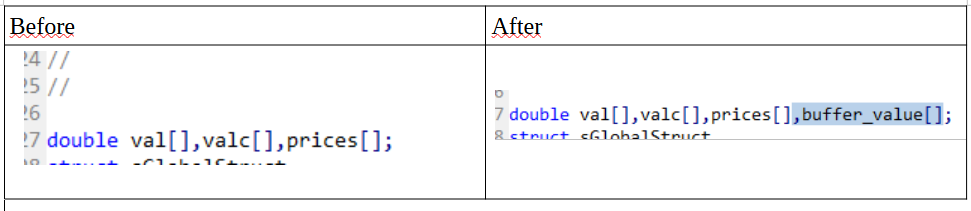
      In addition to the existing buffer definitions, we add a newly named buffer definition.

      91860666-9455-4dc2-8942-42bbae8e5187-image.png
      Our buffer definitions are finished. Now let's make this buffer get a value:

      Again, we determine the name of the INDICATOR_COLOR_INDEX buffer in the buffer definitions under OnInit. In this example "valc"

      fe49e018-253c-4804-aa95-a8b0588467b1-image.png

      We go to the calculation section in OnCalculate and find the valc calculation (assignment).

      8f286fcb-8600-4e4c-b8ab-28993bff0acc-image.png

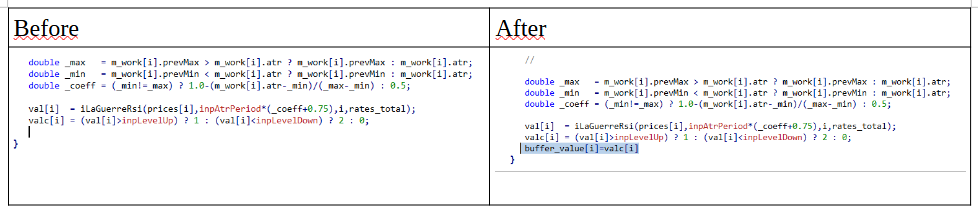
      What we are looking for is here, the result of Level Up and Level Dn:
      ((val[i]>inpLevelUp) ? 1 : (val[i]<inpLevelDown) ? 2 )

      Compile the code you edited and start using it. While there was only one buffer listed before, two buffer options will appear after these operations.

      If the buffer value = 1, you can use it as an increase, and if it is 2, you can use it as a decrease.

      l'andorrà 1 Reply Last reply Reply Quote 4
      • l'andorrà
        l'andorrà @PhiLykia last edited by

        @PhiLykia Simply impressive. Thank you very much. 👍

        (English) I will try to help everyone in these fxDreema forums. But if you want to learn how to use the platform in depth or more quickly, I can help you with my introductory fxDreema course in English at https://www.theandorraninvestor.eu.

        (Català) Miraré d’ajudar tothom en aquests fòrums d’fxDreema. Tanmateix, si vols aprendre a fer servir la plataforma amb més profunditat o més de pressa, t’hi puc ajudar amb el meu curs d’introducció a fxDeema en català a https://www.theandorraninvestor.eu/ca.

        (Español) Intentaré ayudar a todo el mundo en estos foros de fxDreema. Sin embargo, si quieres aprender a usar la plataforma en profundidad o más deprisa, te puedo ayudar con mi curso de introducción a fxDreema en español en https://www.theandorraninvestor.eu/es.

        1 Reply Last reply Reply Quote 0
        • 1 / 1
        • First post
          Last post

        Online Users

        N
        L
        A
        M
        B
        E
        S

        22
        Online

        146.6k
        Users

        22.4k
        Topics

        122.6k
        Posts

        Powered by NodeBB Forums | Contributors